Did you hear about the student who got arrested for printing his text books on his home printer?
He did not use 'Legal size Paper'.
Copyright by Kevan Sinanan
Published: see date of post
Wednesday, January 26, 2011
Tuesday, January 25, 2011
Posting an unchecked checkbox value in php
Hi all!
I have recently discovered a way to return (post) values from unchecked check boxes (check box group) in from a form.
It may not be the most elegant method but it works.
The concept is create 3 arrays:
I have provided the code and download links below.
It is more or less self-explanatory.

[php]
[php]
download php code to return checked and uncheck values
[html]
Download form code here
I have recently discovered a way to return (post) values from unchecked check boxes (check box group) in from a form.
It may not be the most elegant method but it works.
The concept is create 3 arrays:
- for the selected values
- store all checkbox values as a hidden type from the second array. Then we unset or remove the selected values (checked)through a for loop
- Store the remaining values into a new array via reshuffle.
I have provided the code and download links below.
It is more or less self-explanatory.

[php]
  if ($_SERVER['REQUEST_METHOD'] == 'POST'){

$boxes_checked = $_POST['check_box_'];

if(empty($boxes_checked))
{ }
else
{
$N = count($boxes_checked);
echo("You selected $N checkboxes ");
echo "";
for($i=0; $i < $N; $i++)
{

echo($boxes_checked[$i] . " ");
}
}


$check_box_hidden = $_POST['check_box_uncheck'];
$all_checkbox_values = $_POST['check_box_uncheck'];
if(empty($check_box_hidden))
{ }
else
{
$P = count($check_box_hidden);
echo "";
for($i=0; $i < $N; $i++) // step through the checked values     {    echo "";
for($j=0; $j < $P; $j++) //pay attention to $j; stepping through all checkboxes      {         if ($boxes_checked[$i] == $check_box_hidden[$j] ){    unset($all_checkbox_values[$j]);       }      }    }     $unchecked_values_reshuffle= array_values($all_checkbox_values);//reshuffle     }// else if(empty($check_box_hidden))       if(empty($unchecked_values_reshuffle))     { }     else     {    $Q = count($unchecked_values_reshuffle);     echo("You have unselected $Q checkboxes ");     echo "";
for($k=0; $k < $Q; $k++)     {    echo($unchecked_values_reshuffle[$k]. "  ");     }       }       } // if ($_SERVER['REQUEST_METHOD'] == 'POST')
[php]
download php code to return checked and uncheck values
[html]
| 1 | |
| 2 | |
| 3 | |
| 4 | |
| 5 | |
[submit button here] |
Saturday, January 1, 2011
How to tune home room studio in 5 steps (under construction)
What is this ?
In this tutorial I am going to show you how to use your DAW (in this example Fruity loops) to tune your sound cards, speakers to match your studio (in this example my bedroom) without any need for bass traps, sound diffusers or carpeting but by adding one more Equalizer to your monitor channel
Why we would want to do this
We are all familiar when we purchase our new high end speakers especially with powerful sub-woofers and turn the volume up: everything sounds boomy or muddy or cluttered?
What you need
lets get to work
Step1 First you will need the frequency sweep music file or mp3. You can get a frequency sweep file or a single amplitude up to 16KHz at the link: http://www.freesound.org/samplesViewSingle.php?id=22714
Figure A - Microphone Placement top view (click on pic to enlarge)

Grab a condenser mic and secure it in the same position as to where your head is will mixing. Play the frequency sweep file. Be sure to be a safe distance from the microphone so your body does not disrupt any sound reaching the mic from speakers nor from any nearby walls.
Limitations
In this tutorial I am going to show you how to use your DAW (in this example Fruity loops) to tune your sound cards, speakers to match your studio (in this example my bedroom) without any need for bass traps, sound diffusers or carpeting but by adding one more Equalizer to your monitor channel
Why we would want to do this
We are all familiar when we purchase our new high end speakers especially with powerful sub-woofers and turn the volume up: everything sounds boomy or muddy or cluttered?
Also when you spent hours mixing down a track and then put in on another system it sounds totally different.
Many speaker manufactures claim that they sound system better than the other but due to the natural acoustics of your room all these claim are worthless.
What are acoustics?
Acoustics are basically small reflections of sounds the same way your mirror reflects light. How it that a bad thing? Well, all surfaces do not reflect sound evenly unlike your mirror with light.
For example if you walk into a large empty warehouse and you clap your hands you will hear a distinguishable echo (reflection of sound). If the warehouse were filled with items and the floors were carpeted, will echo be distinguishable? The presence and absence of these will affect the acoustics of the room. Every room and item will after the acoustics differently.
Objective
What I am going to show you is how to use a parmetric on your DAW, in this example Fruity Loops, how to get a flat response. Many tutorials you have come across will tell you to buy sound diffuser and carpet your floors.
I will show you without spending a cent and use the software already available to you how to achieve the above.
What you need
- frequency sweep file:- (http://www.freesound.org/samplesViewSingle.php?id=22714) – you may need to sign up to download. Sign up is free.
- microphone
- DAW: fruity loops
- frequency analyzer plugin
lets get to work
Step1 First you will need the frequency sweep music file or mp3. You can get a frequency sweep file or a single amplitude up to 16KHz at the link: http://www.freesound.org/samplesViewSingle.php?id=22714
Play the frequency sweep music file in FL (fruity loops). Here you will notice 3 things.
- Firstly You may not hear the file playing from the beginning until around 200Hz, depending on your speakers and sound card. If you have a sub-woofers you will hear the ultra low frequencies 40Hz.
- Secondly a variation in the volume. This is where the acoustics of your room comes in and this is problem we are going to fix.
- Thirdly, depending where you are situated in the room there is a difference in sound. But here we will assume you seated in front and center of your monitor and left and right speakers, shown in Figure A and Figure B
Figure A - Microphone Placement top view (click on pic to enlarge)

Figure B - Microphone Placement font view (click on pic to enlarge)
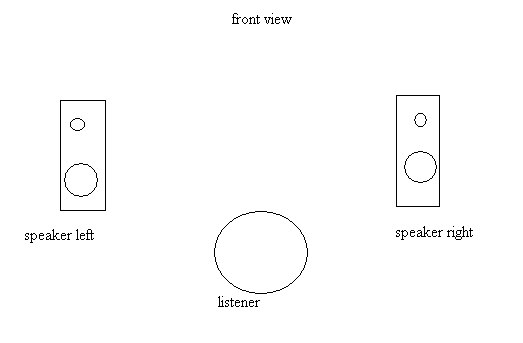
Grab a condenser mic and secure it in the same position as to where your head is will mixing. Play the frequency sweep file. Be sure to be a safe distance from the microphone so your body does not disrupt any sound reaching the mic from speakers nor from any nearby walls.
Save the recorded file and normalize. Now looking at the recorded, you should see a waveform or varying heights. similar to Figure F. If not and you waveform is perfectly level, then congratulations your room is already treated and there is not need for you to continue.
Figure C: Top waveform- Played frequency sweep, Below waveform- Recorded from microphone (click on pic to enlarge)

In my waveform in Figure C you will see a bump around 80Hz then a dip and another bounce and then it flattens out. this is due to the acoustics of my room and to some extent the microphone and speakers response. What I need to achieve is a waveform of no dip and bumps, a flat line hence the term flat response.
Step 2
Load your frequency analyzer. Here I am using the Waves PAZ frequency analyzer. You can use a free frequency analyzer such as bluecat at (http://www.bluecataudio.com/Download/Home/). for the next few steps you can mute your speakers since we will be looping the recorded file which will get very annoying.
Step 3
Load FL Parametric EQ2 , loop you “recorded” file and monitor the the frequency graph. Use the peak hold feature (the brown line in Figure D) to monitor the amplitude of your waveform.
Figure D: Frequency Analyzer with hold and peak function used to monitor (Frequency response of room and by extension the speakers and sound card. (top waveform colored red the test sound the below waveform colored red was obtained from the microphone ). the parametric eq graph peak value, brown line must flat as possible by adjusting the eq in Figures E and F ) (click on pic to enlarge)

Here is a tip: In the recorded waveform there is a bump at certain frequencies. When adjusting the parametric EQ do the opposite, if there a raise at freq x then attenuate freq x on the parametric EQ.
In this step we are only attenuating the freqs. Should not be concerned with the frequencies that are soft/ low in the recorded file. At least not yet.
Figure E: Parametric EQ used to manipulate the output sound in accordance to your room's acoustics, for a more Flat Response (click on pic to enlarge)

Keep repeating this step until the low end and high end frequencies are nearly flat no need to be perfect.
Step 4
This step is only necessary if there are dips or scoops inside the spectrum. Add another parametric eq2 in the chain after the first one. Use a bandpass filter to deal with the dips appearing in the frequency analyser monitor. After a few adjustment the Analyser should be appear to be flat.
Figure F: An additional Parametric EQ used to achieve a better Flat Response output, coupled with room acoustics (click on pic to enlarge)

Figure G: Shows an almost flat response output after EQing (click on pic to enlarge)

Step 5
Save the States of both parametric eqs.
In the output channel of your mixer load the Parametric Eq and laod the saved states in the same order.
Be seated in your position and Play the orignal frequceny sweep file
The frequency sweep can be heard at almost constant volume.
Your Done.
Limitations
Some limitiations of this method
The frequency repsonse of the condenser microphone
The resoltuion if the frequency analyser.
The frequency range of the speakers and sound card.
can you hear the difference?
you should,
Play your favorite song with and without the the parametric in the effects and you will notice that there is no overcrowding of frequencies nor Instruments competing with each other
please feel free to leave a comment and tell me your experience, if it helps you or any problems you may have going through the steps. I am more than willing to help.
Kevan gAz chineerat
Subscribe to:
Posts (Atom)